Showing posts with label crafts. Show all posts

Thursday, November 18, 2010

Posting Under the Influence...

...of my first cold of the season!  UGH!

I guess the winter season has arrive early for me!  I'm sitting here with a bad cold that started yesterday with a nose running like an open faucet and sneezing my head off.  I took Loratadine yesterday and last night, so I managed to get the "faucet" turned off a little, but still feel pretty lousy.  I wish I could go back to bed, but my arthritis was hurting so much this morning that I just couldn't stay in bed any longer.

So...since I don't feel like doing much of anything, I decided that I might as well share some more of my vinyl crafts with you!

This is a floating frame that I made to donate to an auction at my grandchildren's school for their Fall Festival.


This tile is sooo ME!  I scraplifted this quote some time ago, thinking that I would turn it into an embroidery design for a sweatshirt, but when my hubby brought home a few tiles, I decided to use the design to decorate it!
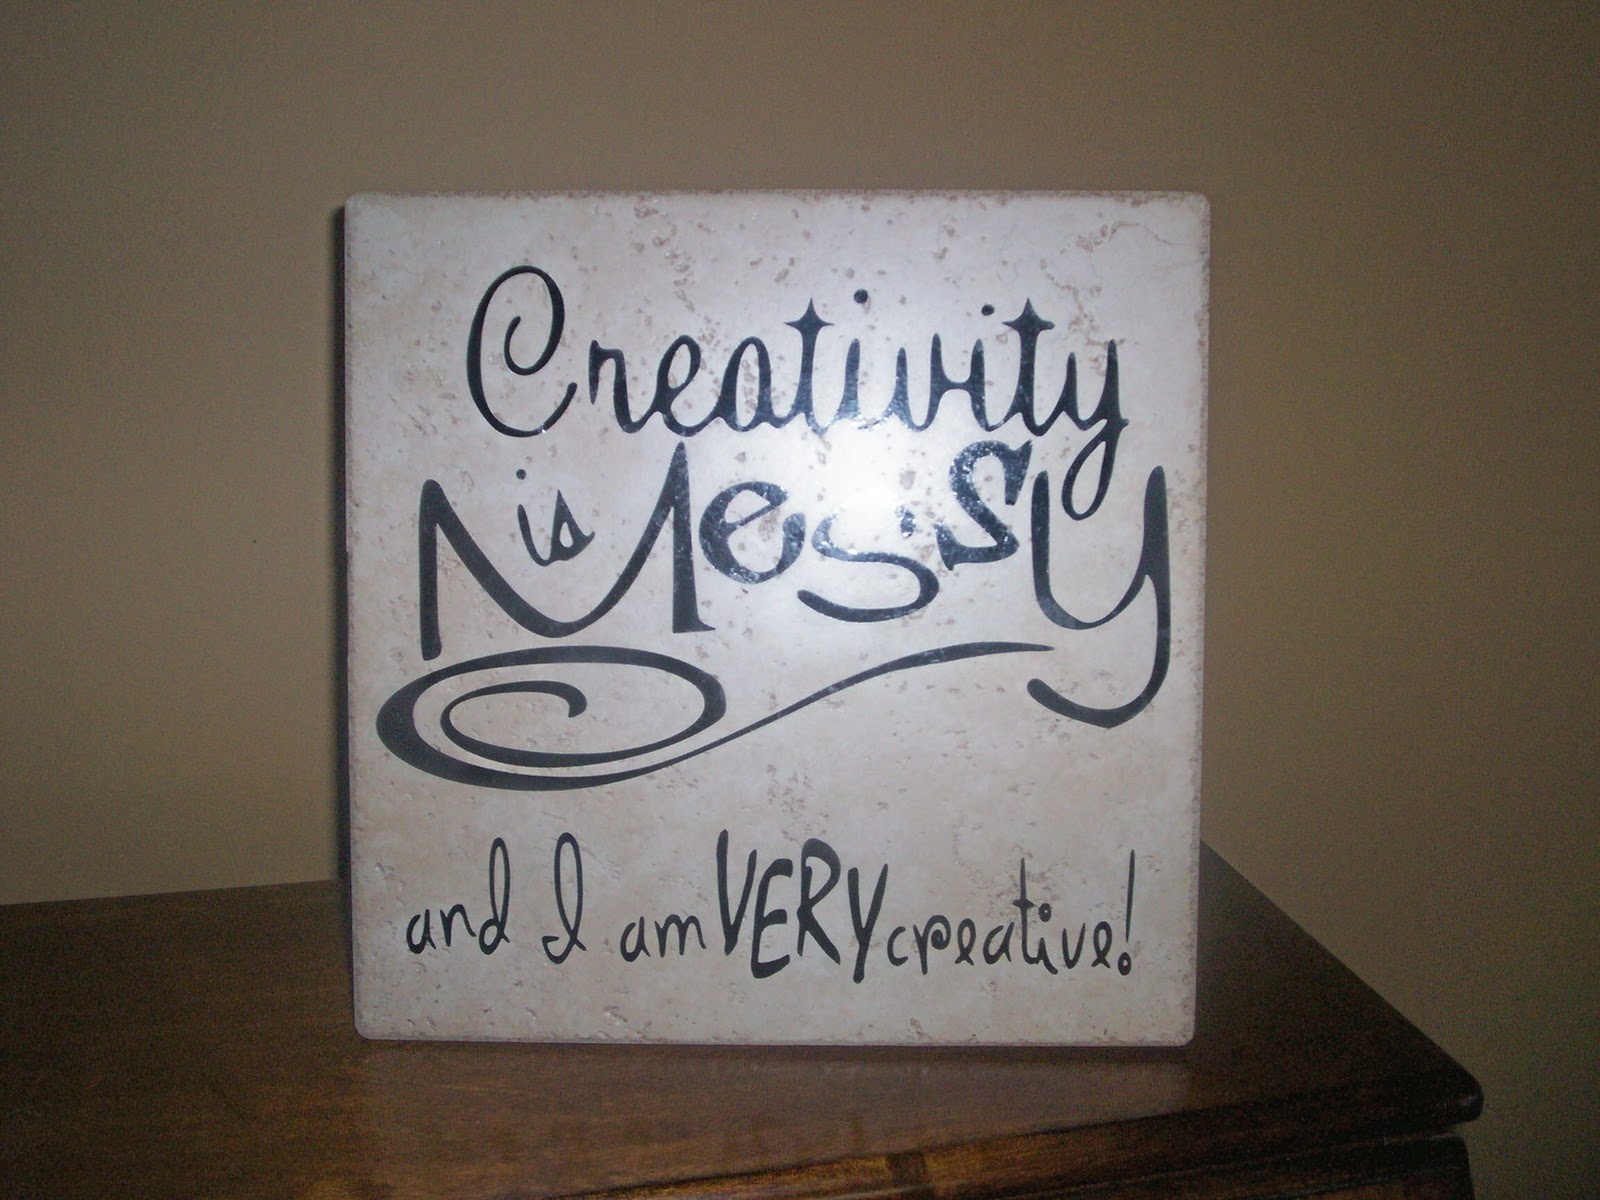
I didn't want to hang the tile on a wall, so I used the easel back from an old picture and glued it to the back of the tile with some Liquid Nails, since I was out of E6000 glue.  It's not centered because I used a tape measure that had a messed up end. so I was measuring from 1" across to 13" instead of across to 12".  I was tired and not thinking straight, so when I marked the center point, I messed up and figured half of 13" instead of half of 12" and counted backwards 6-1/2" from 13"!  I must have really been tired because I never noticed how off-center it was!  Oh, well...it still works! LOL!

View from the side.

This is a name frame I made as a wedding gift for my hubby's great-nephew and his wife.  I got the frame at Walmart for $3.  I had intended to make it into a floating frame, but since the picture opening is hinged onto a permanent backing, I was afraid I'd mess it up if I took it off.  So...I had some 8-1/2" x 14" cardstock that I used to make the background.

First, I sprayed the cardstock with spray-on Kilz primer so that the cardstock wouldn't soak up my metallic copper spray paint (I chose the copper to coordinate with the copper color in the frame.  The next step can be skipped, but I think it gives the metallic copper a richer look.  After the primer dried, I spray painted the cardstock with satin black paint.  After that dried, I then sprayed on the metallic copper.  After it dried, I laid the glass from the frame on top of the cardstock and cut around it with my rotary cutter.

I used my Cricut to cut out their last name in black vinyl and applied to the cardstock.  I then used my Cricut to cut out their first names in a beige vinyl.  I flipped the design so that it would cut backwards.  I applied the backward-cut first names to the BACK of the glass, so that when the glass was in the frame, the names would be right-side out.  By doing the first names this way, the front of the glass will be easier to clean.

Since I already had everything but the frame, this wedding gift cost me a total of $3!  Not bad!

I hope you've enjoyed seeing some of my projects!  I have another one in the works that I've been procrastinating on finishing because it involves layering two different colors, which I've never done before.  I'm a little nervous about how it will turn out, but I guess if it doesn't turn out well, I can always scrape off the vinyl and give it another whirl!
Have a GREAT weekend!

Wednesday, October 27, 2010

Stencilling with a Cricut

My next adventure in Cricuting was making stencils out of clear contact paper.  I went out to my crap craft shed and found the bottle of Armour Etch that I bought years ago.  I had no idea whether it was still any good or not, but decided to see.

I am woefully behind on wedding gifts and needed one for a young couple whose surname is Byrd.  I had a nice vase, so I decided to decorate it for them.  I cut a fancy B out of the contact paper and, just for fun, also cut out a little bird on a branch right over the "B"  I applied the vinyl to the vase, although I had to cut the sides of the vinyl AROUND the design in order to accommodate the curve of the vase.

I pressed the contact paper down really well, especially around the edges of the design, and then I applied the etching cream and prayed that it would still work in spite of being 10+ years old.  I waited about 15 minutes, and then scraped the etching cream back into the bottle and ran the vase under running water to wash off the rest of the etching cream.  I then removed the contact paper to see if the etching cream worked.

IT WORKED!!!  WOO HOO!  No need to buy more of that expensive stuff!

I put a blue towel inside the vase in hopes of getting a decent picture, but you can barely see the branch on which the little birdie is sitting.  Anyway, I think it turned out pretty cute, and I hope that T and C like it!


I then started thinking about what else I could etch.  I thought about my Pyrex bowls and pans, and how I've always had to write my name on a piece of masking tape to stick to the bottom of the dish at pot luck suppers.  So, I cut out another stencil, along with a curvy little design on each side, and stuck it on my Pyrex meat loaf pan.  I did both sides of the pan this way.  I should be pretty "cool" at the next pot luck supper with my monogrammed cookware!


While I was looking for the Armour Etch cream, I came across some candles that I had bought on sale a couple of years ago.  I had intended to try my hand at hand-painting candles but never got "a round tuit".  I also found the bottle of candle medium that I bought for that unattempted project, along with a bottle of black craft paint.  Yeah!  I was in business!

Well, I did a couple of candles, and I'm not thrilled with either one of them.  I wiped down the candles with alcohol, let them dry and then applied the contact paper.  It was hard to get the contact paper to stick down very well on the candles,, and the paint is best when applied with a wide foam brush.  The nativity scene was supposed to have a very thin arch over the whole scene, but I ended up scraping it off.  I also got the bright idea of applying glitter to the star, but managed to glitter Joseph's head, as well.  Oh, well, this will do for us, but I wouldn't give it to anyone else!


My next candlepainting project was this fancy monogram.  Again, it was hard to get the contact paper to stick to the candle well, and while I was stuggling with it, I managed to get it crooked!  This design is too fancy, and some of the parts of it are just too thin to do well as a stencil on candles.  It'll do for us, though!


A poster on the HGTV craft boards suggested that I cut my designs out of black tissue paper and use a piece of waxed paper to hold the design against the candle while I use a blow dryer to melt the candle wax just enough to soak into the tissue paper design.  I have a few more candles, so I'm going to give that idea a try.

I've been painting the doors and trim in my entry way this week, so I will be back as soon as I finish that job and get the walls painted!


Monday, October 25, 2010

My Latest Obsession

I just realized that if I had waited until MONDAY to post my previous post, I would have had something for Smiling Sally's BLUE MONDAY!   That's what I get for jumping in and posting without my brain in gear!

My sweet hubby bought me a Cricut Create for Christmas.  He totally missed Walmart's Black Frday sale of the Cricut Expression that I really wanted, but...oh, well, it's the thought that counts, right?

However, when I opened the box, there was no cartridge inside!  Apparently, someone had stolen the cartridge.  So, off to Walmart I went.  They had one more Create in stock...and someone had stolen the cartridge out of that box, too!  Finally, Walmart's manager just gave me a cartridge.  The only problem was that it was a "Home Decor" cartridge.  Sure, it had lots of cute stuff on it, and I did play with it for quite a while, but that cartridge had NO FONTS!  It's kind of hard to personalize stuff without any fonts.

Given our financial situation, my hubby didn't see any need for spending money on either a cartridge or the Make The Cut program that I really wanted.  With Make The Cut, I wouldn't need any more cartridges!

So, my Cricut Create sat, mostly unused, until September, when my wonderful mom gave me birthday money!  WooHoo!!!  I promptly sat down and ordered MTC!

It is super simple to use, and I really like that I can take simple images and convert them into die cuts!

All I needed was something to cut...preferably vinyl.  I was out of money, so I asked a friend who owns a printing/sign business if I could buy some of her scrap vinyl.  She GAVE me a whole box full! WooHoo, again!

The very first thing I made was this 4" tile as a gift for my cousin and his wife who were both celebrating their birthdays.  I had planned on making a set of 4 coasters; but, I was running out of time, and this intricate design took quite a bit of time to weed out the unwanted vinyl.  I turned it into a wall decoration, instead.

This is not the finished version.  I had to stop at Walmart on the way to the party to get some ribbon and sticky-back felt to finish it off.  I used E6000 glue to glue a length of 1-1/4" wide sheer black ribbon to the back.  I glued ribbon all the way down the back of the tile for extra security.  I then cut a square of black felt and applied that to the back.  For what it's worth, I do NOT like the sticky-back felt...it's very hard to work with, IMHO!  I was pleased with how well it turned out, and my cousins were delighted.


Then, my hubby came up with a request.  He had just gotten back from a fishing trip to our trailer in Arkansas with his buddies.  His buddy, Daryl, had rotten fishing luck that weekend, and my hubby likes to "rub it in" a little.  He asked me to decorate a coffee cup for Daryl, who was a good enough sport to laugh about it!

 My daugher-in-law likes to decorate for Halloween, so I made her this tile and finished it with the ribbon in the same way that I finished my cousins' tile.


For a more serious gift, I bought this fall charger at Walmart and applied a vinyl monogram.  She said that this was just the kind of thing she likes!


Then, my hubby came back with another request.  Our business phone numbers changed a while back, but we had not yet changed the numbers on our work trucks.  The work trucks got new phone numbers, and then I made new vinyl signs to put in the back windows.  We figure that people might notice those signs better than they might notice the signs on the sides of the trucks.  Maybe my signs will help our business!

I'll be back later with some more pictures of my obsession craft projects! Have a great week!

Saturday, October 23, 2010

I'm still around...alive and kicking!

WOW!  It's been a LONG time since I posted!

In case anyone was wondering, no, I'm not dead, nor did I drop off the face of the earth!

With all the hullabaloo of my husband's illness, my own health issues, and our financial setbacks last year, I just lost my posting and crafting mojo.  I did make a few things for Christmas, but that was about it, as far as crafting goes.

Hubby is doing very well now, despite a few set-backs.  He had issues with his blood thickening up, so had to take blood-thinners for about 8 months.  He also had another foot injury which put him back into the hospital for a few days, but the infection wasn't as bad as it was last year.  He now has a CPAP machine, which alleviates my fears that I might wake up to find that he quit breathing without starting back up again.  He had some issues with heart palpitations, but another heart catherization showed NO BLOCKAGES.  Thank goodness!  I'm inclined to think that the palpitations may have been mild anxiety attacks, as he's not had another spell of them since the catherization.  I believe that the catherization probably alleviated his worries, and thus eliminated the palpitations.

I'm at home full-time now, as my arthritis in my knee, hip, hands, and spine make it very difficult to be on my feet for very long or even do computer work on a full-time basis.  I'm currently awaiting a disability hearing...sometime within the next 8 months...MAYBE!   The knee was functioning OK for a couple of yeras, after I had a cortisone shot directly into the joint; however, the shot is now wearing off.  I'm hoping to be able to get another shot very soon.

Our oldest grandson graduated from high school in May, and is in his first semester at college.  It was a blessing that he won  enough scholarships to pay for his first semester!  We're very proud of him!

I started getting my crafting mojo back by monogramming sheets and towels for him to take to college.  I didn't take a picture of those, for some reason.

Our youngest grandson turned 3 in August, and since he graduated to a full-sized "big boy" bed, I decorated some sheets for him with machine embroidery and a little red rick-rack..

Here's the top sheet, from left to right.  The bottom sheet matches the pillowcases and coordinates with the top sheet.


I've been making quite a few things over the past month, but I'll save those for another post!

Monday, September 15, 2008

I'm not the only crafty person...

...in our family! My mom is pretty crafty, even at 92, and so is my son!

I think that Mama is just about finished with making baby quilts, although I think she is currently working on one. She has probably made at least 25 of her hand-embroidered and hand-quilted baby quilts for the babies in our family. The last one that I KNOW she finished was the one she made last year for my youngest grandson. I don't have a picture of that one, which is a "Humpty Dumpty sat on a wall" design. Here are the ones that she has made for my niece's 3 boys. I have one that she made for one of my angel babies 27 years ago.

She uses vintage embroidery patterns from, I think, the 40s, and they are as cute today as they were back then!


One of the things she currently makes, as baby gifts, are these cute little gingham teddy bears. She hand-embroiders their features and the heart and belly-button on them, and she sews the ribbon bow on so that a baby can't get choked on them.

She also makes these cute little "twin" dolls!


She hasn't made any Humpty Dumpties in a long time, but I think that just about all her grandkids have one.

Our son, who did a LOT of the work on his new home, has been working on finishing the bonus room over the garage. He has installed a mini-bar/kitchen area in it. Here's the vessel sink that he installed. He found the pump at our local hardware store and plumbed it so that the handles on the wall work with it. He drilled a hole through a chipped enameled washpan to make his sink. He also built the cabinet that it sits on. Isn't it just the coolest thing?


My sisters are both pretty crafty, too; but, they aren't into taking pictures of their stuff. One sister is like me...trying her hand at almost anything. My other sister is more into sewing and smocking. She has three granddaughters, so she pretty much stays busy with sewing their wardrobes. However, she has been making a few things for my grandbaby. I just haven't gotten "into" smocking.
She made this little "Noah's Ark" outfit for him to wear at Easter.
She also made his birthday outfit.

I guess we are just a creative bunch of folks!

Today is my son's birthday! It's hard to believe that in 3 short years, we'll be planning his 40th birthday "Over the Hill" party! Of course, I was a mere BABY when he was born! ;)

Have a great week!

Monday, September 8, 2008

More Stuff That I've Made

Our youngest grandson just turned a year old, and I wanted to give him something that I think every little kid needs...a little red rocking chair. I found an unfinished one at a local furniture store (ON SALE!) and gave it a few coats of bright red paint. I was planning to paint his name and some kind of cute design on the back, but then I thought, "I want to do something DIFFERENT!"


So, I went out to my arts and crafts and sewing shed, and made these little padded sleeves for the back of his chair. I used my embroidery machine to embroider his "name train" on one and left the other one plain. Here is a close-up.


His mom, our teacher DiL, had her birthday a few days later, so I made this tote/purse for her. I was inspired by the cute totes at http://hello-refabulous.blogspot.com/ You should check it out; I think she is an amazing young woman. She has eight children, homeschools, and still manages to find time to create beautiful items! This is my first try at ever making a purse, but I think it came out pretty well. I had some wooden apple cutouts, so I drilled a couple of holes in one to turn it into a button and painted it. It's on the closure, which is backed with velcro.

Here's one of the inside pockets, and the lining coordinates with the school print on the outside.

In June, I had the opportunity to get together for a weekend with 6 of my online friends and the mother of one of them in Pigeon Forge, TN. We all chipped in and rented a big log cabin on the side of a mountain, and we had a blast! It was as if we have known each other all our lives!

I made a personalized drink huggy as a small gift for each one of them. They are really easy to make!


What do YOU like to do?

Artsy-Fartsy Stuff

One of my interests is arts and crafts, and I sometimes combine it with sewing. I sometimes dream of being able to earn a decent living by selling my creations; but, in reality, I'm too slow and have to be in a creative mood. I also figure that if I HAVE to produce things in sufficient amounts to sell, it probably would no longer be a fun thing to do.

Here are a couple of the things I've made this year.

This is a "shabby chic" wall pocket/planter. You can line the bottom with sheet moss, or a coffee filter, fill with dirt and a pretty plant, and hang it on a fence. You can also just use a piece of floral foam and silk flowers to make an arrangement to hang on a wall or door in your house.

It's made from a 1-gallon can, with both ends cut out, painted, sanded, decoupaged, antiqued, amd sealed with an acrylic sealer. One end is mashed flat and wired together, with the flowers and ribbon hiding the holes and wire. I also draped pieces of a crystal Christmas tree garland to add a little sparkle.

Right now, I'm into making checkbook covers, because the plastic one I got from the bank tore up, and I REFUSE to pay $5 for another one! This is the first one I made and gave to my daughter. It turned out pretty well, but I was not pleased with the satin stitching on the edges...probably due to the extra inner facing that I used, so my newer ones are going to be finished with seam binding.


I have more pictures, but they'll have to wait for the next post! G'night!